It’s your time to say goodbye to iFunny I guess? right! Don’t worry I will make it too easy for you to delete your iFunny permanently. The popular meme-sharing app iFunny is the best place to enjoy your free time for many people but not for everyone. I know so many of you are just like me who get irritated by all those daily spammy emails, and texts.
But some of you might have different reasons which are:
1. Not everyone’s cup of tea: That’s not weird but iFunny’s content can be hit-or-miss, and some users may simply find that they’re no longer interested in what they’re seeing on the platform.
2. Too many ads: For me, this is another important reason to delete my iFunny account. As you iFunny is known for its high number of ads, which can be very annoying.
3. Concerned about privacy: Privacy is a major concern on social media nowadays and iFunny has a history of privacy concerns, There are reports and complaints that it collects user data without their permission. (I’m not supporting this statement but I heard it from many people.)
4. Found a better alternative: There are a number of other meme-sharing apps available, and some users may find that they prefer one of these alternatives to iFunny.
Other: Oh yes, there are some other reasons to delete the iFunny account as well, like some of you want to take a break from your social media presence.
But whatever your reason is for deleting the app permanently, here I am to help you with these simple steps. But first, you need to understand that:
If you are going to delete your account permanently you will also lose all your data and the thing is you cannot recover it again. So, I recommended downloading a copy of all your iFunny data before deleting the account. To do this, go to Settings & Privacy > Download Your Data
How to Delete Your iFunny Account through the App
In the iFunny App, the application software allows you to remove your iFunny group. Still, Users can only use this feature on a finite number of devices. Users are given instructions on how to Delete their iFunny Account By The App, Their Steps :
Step-1: Open the iFunny app and log in to your account.
Step-2: Tap the profile icon in the top right corner of the screen.
Step-3: Tap the settings gear icon in the top right corner of your profile page.
Step-4: Scroll down and tap Delete account.
Step-5: Enter your iFunny username and password to confirm deletion.
Step-6: Tap Delete account again.
How to Delete iFunny Account by Email
Users are required to forward an email to the iFunny team/support. Visitors can follow guidelines for the process, To delete their iFunny accounts permanently.
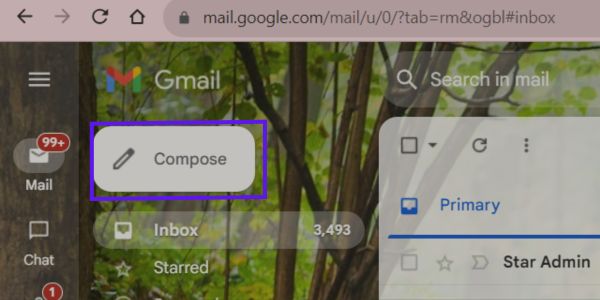
Step-1: Go to your email and compose a new email.
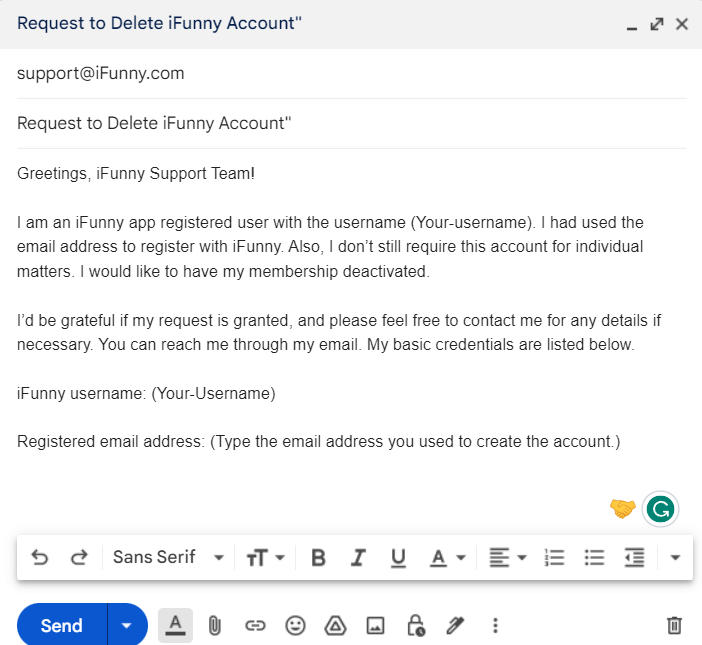
Step–2: In the subject line, type “Request to Delete iFunny Account“.
Step-3: In the body of the email, state that you would like to have your iFunny account deleted permanently.
Make sure to include your username and email address associated with your iFunny account.
Step-4: Once you have finished writing the email, send this mail to [email protected].
You have to remember, After sending the mail you should wait at least 2 or 3 days for your account to be deleted. You should also incorporate essential details in the email to verify to the support team that the account in question belongs to you.
Things to know when deleting your iFunny account permanently
- Deleting your iFunny account will result in the permanent removal of all your uploaded content, comments, likes, and followers. Once the account is deleted, this data will be permanently unrecoverable.
- If you stop using your iFunny account without deleting it, the account might become inactive due to prolonged inactivity. However, it is advised to follow the correct deletion procedure to ensure the protection of your data.
- Before deleting your account, consider if there are alternatives like taking a break from the platform or adjusting your privacy settings to maintain a lower profile.
- Deleting the iFunny app from your device does not delete your account. You should attach to the provided steps to formally initiate the account deletion process.
You may also like:
- How to Delete a Payment Method on DoorDash
- How to delete a playlist on Youtube
- Delete A Youtube Account Without Gmail
Conclusion
In conclusion, Deleting the iFunny account is a considered process to protect your data and privacy. By following the steps defined in the guide, you can successfully delete your iFunny Account. Remember that account deletion is irreversible, so make sure you back up any content you wish to keep. Whether you’re see